Short Answer
Connect your Shopify store by creating a custom app in the Shopify Dev Dashboard, configuring the required access scopes, and entering your Client ID and Secret in PODtomatic. The entire process takes about 5 minutes.
Before You Begin
Make sure you have:
- A Shopify store with an active plan (any plan works)
- A PODtomatic account — sign up here if you haven't already
- Store owner access — you need permission to install custom apps
Step-by-Step Connection Guide
Follow these steps to connect your Shopify store to PODtomatic:
Step 1: Open App Settings in Shopify
Log in to your Shopify Admin, go to Settings, then click "Apps and sales channels". On that page, click "Develop apps" to access the developer app settings.
Step 2: Go to the Dev Dashboard
Click the "Build apps in Dev Dashboard" button. This will take you to the Shopify Partner Dev Dashboard where you can create custom apps for your store.

Step 3: Create a New App
Once you're in the Dev Dashboard, click the "Create app" button to start setting up a new custom app.

Step 4: Configure the App
Select "Start from Dev Dashboard" as the creation method. Enter "PODtomatic" as the app name, then click "Create".
Step 5: Set Access Scopes
On the "Create a version" page, you'll need to paste the required access scopes. Copy the entire string below and paste it into the Access scopes box, then click "Release".
Required access scopes — copy the entire string:
read_assigned_fulfillment_orders,write_assigned_fulfillment_orders,read_customers,write_inventory,read_inventory,read_locations,read_merchant_managed_fulfillment_orders,write_merchant_managed_fulfillment_orders,read_orders,write_orders,read_products,write_products,read_publications,write_publications,read_third_party_fulfillment_orders,write_third_party_fulfillment_orders 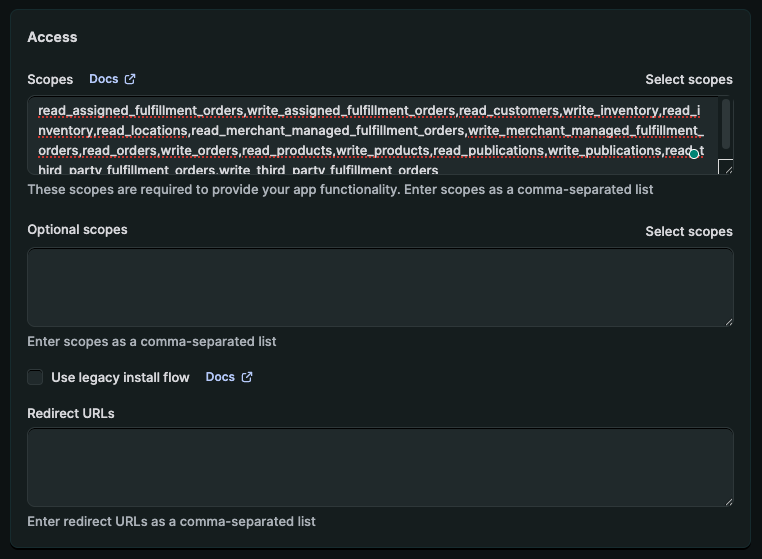
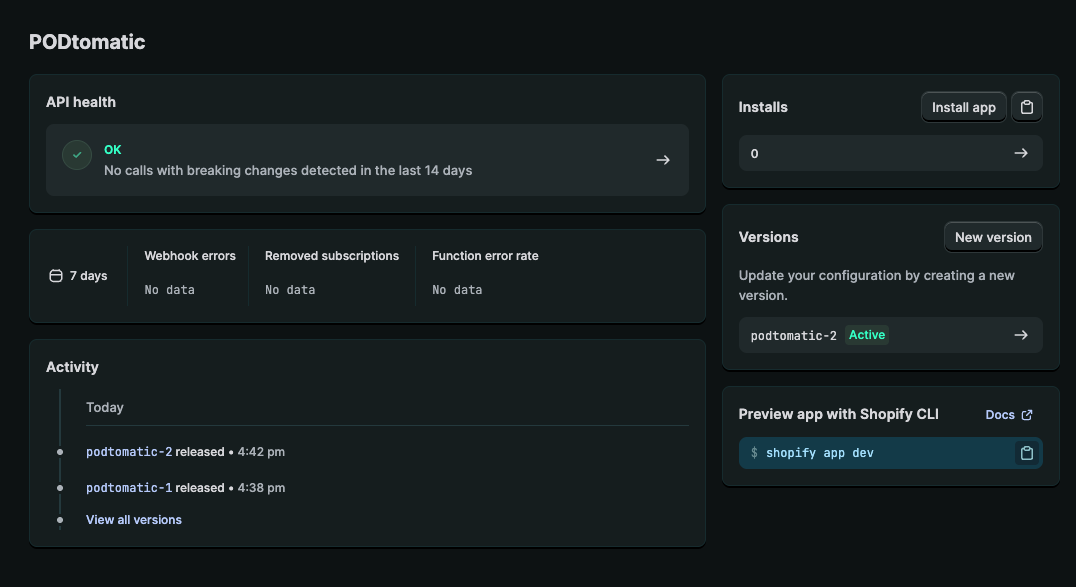
Step 6: Install the App
After releasing the version, go to the app's Home page and click the "Install app" button.
Step 7: Confirm Installation
Click "Install" to add the app to your Shopify store. If you see a notice about your store's domain, you can safely ignore it — this is normal for custom apps created through the Dev Dashboard.
Step 8: Copy Your API Credentials
Once the app is installed, go back to the Dev Dashboard. Navigate to your app's Settings page and copy both the Client ID and Client Secret. You'll need these in the next step.
Important: Keep your Client Secret private. Never share it publicly or commit it to version control.
Step 9: Connect in PODtomatic
Log in to your PODtomatic account. Go to Store, then click "Connect". Enter your Shopify shop domain (e.g., your-store.myshopify.com), along with the Client ID and Client Secret you copied in the previous step.

Step 10: You're Connected!
Click "Connect" and you're all set. PODtomatic will now sync with your Shopify store automatically.
✅ Congratulations!
Your Shopify store is now connected to PODtomatic! You can start creating and syncing products to your store right away.
Troubleshooting
❌ Connection Failed
- Double-check your credentials — make sure you copied the full Client ID and Client Secret without extra spaces
- Verify your shop domain — use your
.myshopify.comdomain, not a custom domain - Check app installation — confirm the app is installed on your store (Step 7)
🔄 Scopes Error
- Copy the full string — make sure you copied all the scopes without missing any
- No extra spaces — the scopes should be comma-separated with no spaces
- Create a new version — if you need to update scopes, create a new app version in the Dev Dashboard
⚠️ Domain Notice During Installation
- This is normal — Shopify shows a domain notice for custom apps created via the Dev Dashboard
- Safe to ignore — your app will work correctly regardless of this notice
Still having trouble? Contact our support team for help with your Shopify connection.